P5: SOURCE SPECIAL EFFECTS FOOTAGE IN LINE WITH PRODUCTION PLAN
Behind the Scenes - Sourcing my Special Effects
Special Effect Makeup -
In this video I explain what special effect makeup I will be using and how I will be applying it. I have never done special effect makeup before so, apart of my crew, my friend who has applied special effect makeup before will be demonstrating and guiding me on the best techniques in production. The special effect make up is from Claire's.
The Fake Blood is from Tesco's in the halloween section. I have used this before and so has the actress, so we know it is safe to use on the day of filming.
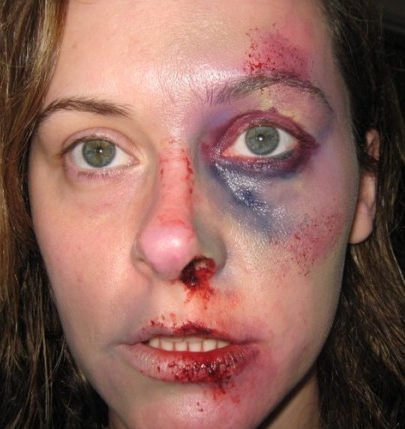
Special Effect Inspiration
I am aware that my special effects will not look this realistic as I myself do not have the required experience for this skill. However, I have chosen these images as a base to work around and follow. When applying the fake blood, I will blotch it on and then relayer to emphasis the wound and make it look the injury happened recently.

Behind The Scenes Video -
This Behind The Scenes video shows the setting up of the green screens on one of the doors and the corridor, as well as the special effect makeup being applied. I noticed it would be difficult to pin up the green screen for one of the doors so I asked in advanced for two of my friends to hold the green screen up straight while I film that part of the sequence. The video shows my friends practising holding the green screen up while I was directing them on the best and safest way to hold it with as less creases as possible.
Reviewing and Editing my Sourced Footage
In these shots, I will not be using the sound and will instead add music and diegetic sounds,
Rushes One
I think this shot will work for the film sequence as it is a suitable beginning to slowly reveal and establish the scene. I personally like this shot as it begins with the shoes to immediately capture the attention of the audience, by making them wonder who the character is and what is going to happen next. This shot was conducted twice as I wanted the actress to as central as possible. From my storyboard, I intend to have a jump cut to the next shot of a closer shot of the character. In the final piece, I think this shot will be effective in the final piece as it will be simple to apply the effects of a blue tint and adjust the lighting.
Rushes Two
I think this shot will work as it slowly reveals the character and the special effects. The lighting is not perfect and does not show the full effect of the fake blood but it is visible. This shot will help the narrative as it shows that the character is injured and adds to the background of the character, also by creating a mystery with the audience wondering what happened to her. From this shot, I intend to have a simple cut to reveal the visual effects in the sequence in the corridor. Now analysing this shot, I think my directing could have been more effective as I think it would have been better if the actress held a longer look in the direction of the camera and also would have stopped central, instead of continuing round. The green screen was not up at this point so I will be only using this shot to first introduce the appearance of the actress and the special effects.
Rushes Three
There are problems with this shot as the green screen was not lifted in time and was creased. This will possibly bring problems when applying the visual effects and will not be suitable in my sequence. However, besides that, the shot of my actress is good for the narrative, as it shows how confused the actress is and will be a good shot of the actress to finish the sequence on. This is so the audience are feeling similar emotions to the character and are also, hopefully, curious to what happens next. As a final shot, I would intend to have the shot fade into darkness by using a cross dissolve. If I were to use this shot, I would need to crop and trim part of the shot to hide the mistakes.
Rushes Four
I don't completely like this shot as I found it difficult to direct and film the exact impression I wanted to achieve. I wanted it to look like that the floor was still unstable, as the actress had just fallen down. However, I think this shot could still possibly work as it features the green screen. I would have liked if the actress got up quicker and had more of a struggle to emphasis how difficult the situation she is in. I think it does help the narrative as it shows her struggle and aim to get out of where she is, as she is unknowingly stuck in a dream. I plan to have a quick cut to keep in time with the action and show a close up of her gripping the handle while trying to open the door.
Rushes Five
I think this shot will work in the film sequence although I am completely sure how it will be when it comes to editing the visual effects on the green screen. This shot helps the narrative as it shows the character's journey of struggle to try to find away out, an escape in the midst of confusion on how she ended up there or not knowing she is stuck in a nightmare. This is the first shot where the illusion of the corridor is presented. I plan to cut to the next shot through the transition of a jump cut to keep the speed of action going and shorten the end of the shot so it cuts right after she falls. I found this shot difficult to direct as I had to focus on tilting the camera the correct way and make sure the actress performs in time of the camera movements. I think my directing could have been better as I wanted the actress to appear more unstable and show a deeper expression of anxiety, fear and confusion. This shot took several takes but I think shot will be effective enough for the level I am working at and gives the overall look I had in my head.
Music Options
I think I will use this music as it brings and adds to the suspense through the unsteady ringing, especially in a nightmare fantasy. This music is from a copyright free music YouTube account, with credit to the author Kevin MacLeod.
Green Screen Videos
Green Screen Videos
For the separate green shots, I will use of these videos to create a space effect to another dimension or world.
I prefer this space background because it does not contrast too harshly with the blue steel effect I may use. The actions of the stars are also more lively and are coming at the audience, to keep them engaged.
This video I think will be cool to use as it is a completely different scenery to space and brings the craziness that can happen in nightmares. This also brings colour to the film sequence, which is mostly a cold effect until the end, when this video shows a fire red that emphasis the danger the character could possibly be in.
Behind the Scenes - Sourcing my Visual Effects
Slideshow of labelled shots - Click arrows to view images.
Editing The Effects
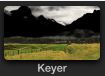
In my film sequence, I used the visual effect of chroma key. This screen recording shows the process of adding the videos I have sourced and applying them to the film sequence. One of the visual effects I added was a video of a volcano erupting, which was placed for the green screen behind the first door. I clicked effect called 'Keyer' and applied in onto the footage of the green screen, which then turned the green screen black. Once the effect had rendered, I placed the selected part of the video of the volcano on top. I found this part slightly tricky as the Keyer effect did not work efficiently as I had wanted. This was most likely because the colour of the door was blue and therefore was also being chroma keyed in as part of the video. I used this same process in applying the space video for the second door reveal, which I found easier to apply as this was my second time applying the visual effects. Whereas I had to learn what effects to apply to change the backgrounds for the first green screen and even then, I found it a trial and error experience to fully apply the effect successfully.
I found editing the green screen in the corridor the hardest as because I didn't light the green screen correctly, it took several effects in keying to be able to create the illusion effect. This process was also very long and took much detail in having to move and repeat images on top of each other, to make it look like the corridor was moving. I used the transition tool which allowed the images to be rotated at a tilted angle and then repeated this process through the keyframes of the green screen. For this part, I used the filter called 'Fisheye' and applied this so the edges of the frame became distorted and gave a uneasy sense to the shot. The audience would then also be looking at the actress in a distorted way like you would see similar in a dream, as many nightmares are unclear. I found using the transition tool confusing to use, as there was different settings and was difficult to get what I wanted to achieve exactly. Parts of the green screen could be seen when rotating the images and I found this a tiring action. The 'Fisheye' filter was easier to apply as I knew how to adjust the amount and radius of the distortion.
I found editing the green screen in the corridor the hardest as because I didn't light the green screen correctly, it took several effects in keying to be able to create the illusion effect. This process was also very long and took much detail in having to move and repeat images on top of each other, to make it look like the corridor was moving. I used the transition tool which allowed the images to be rotated at a tilted angle and then repeated this process through the keyframes of the green screen. For this part, I used the filter called 'Fisheye' and applied this so the edges of the frame became distorted and gave a uneasy sense to the shot. The audience would then also be looking at the actress in a distorted way like you would see similar in a dream, as many nightmares are unclear. I found using the transition tool confusing to use, as there was different settings and was difficult to get what I wanted to achieve exactly. Parts of the green screen could be seen when rotating the images and I found this a tiring action. The 'Fisheye' filter was easier to apply as I knew how to adjust the amount and radius of the distortion.
|

|
